how to add tvaddons to kodi
TVAddons used to be the most popular repository for third-party Kodi addons. However, even though their website and repository are still online, TVAddons is a shell of it's former self.
In this article, we're going to look at how to install the TV Addons repository in Kodi, but we're also going to see if it's still worth it.
First, let's give a little background on what TVAddons is, and what happened to them.

What is TVAddons and What Happened to Them?
TVAddons has been around for about a decade, but that hasn't always been their name. Originally, the repository was housed at xbmchub.com, and later at tvaddons,ag. However, TVAddons, which was based in Canada, was sued by some of the biggest telecom companies, Bell, Rodgers, Videotron and TVA back in 2017. Those domains were seized as a result.
Unfortunately, those lawsutes have been in process for several years, and it doesn't look like there will be any resolution anytime soon.
What does that mean for TVAddons?
Now, many of the addons that are included in the TVAddons repository are official, legal Kodi addons for different streaming services like Disney+, Netflix and CuriosityStream.
However, you'll still find a lot of third-party addons there as well, so it's definitely worth taking a look.
How to Install the TV Addons Repo in Kodi
Now that we have a little more background on TV Addons, let's cover how to install it on your Kodi device.
If you've followed any of my other tutorials, this process should look familiar. However, there are a few quirks to installing the TVAddons repository, so I recommend following along closely.
For the purposes of this tutorial, I'm using a clean installation of Kodi 18.9 Leia. I haven't installed any other addons or even set up my media libraries. That should make it as easy to follow as possible.
Important Note: For version 19 (Matrix), Team Kodi upgraded the programming language they used to Python 3, which subsequently broke many popular addons who were built on Python 2. As a result, many popular addons will not run properly on Kodi 19!
I recommend installing the TVAddons repository on a device running Kodi 18.9, for now.
Step 1: Enable Addons from Unknown Sources
When you first install Kodi on your device, it only includes access to the official Kodi repository. There, you'll find a selection of addons that are vetted and/or maintained by Team Kodi.
With those, you can change the look & feel, add new video sources, backgrounds and some really useful utilities.
What makes Kodi popular is the ability for third-party developers to create new addons to give Kodi new features and functionality. However, in order to install those addons, you'll need to change a setting which enables addons from unknown sources.
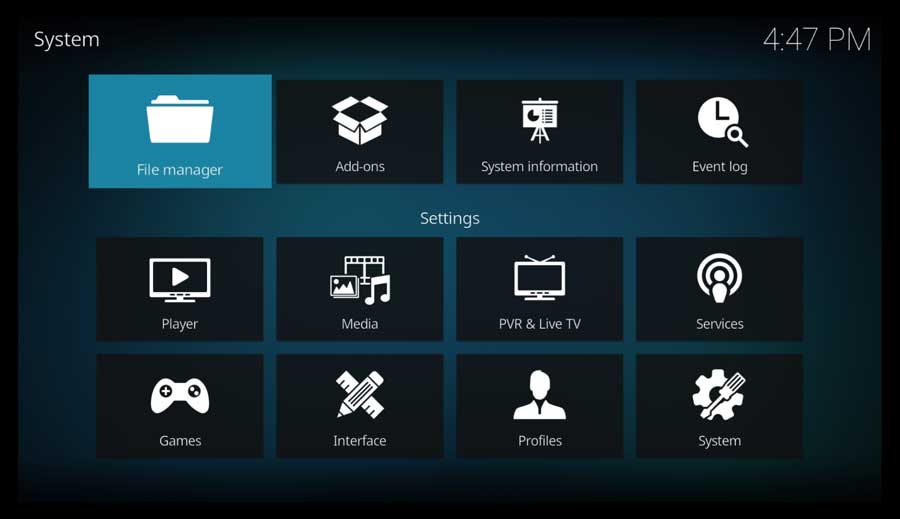
To get started, go to the Settings Menu and click on the System icon in the bottom right-hand corner.

Next, scroll down to the Add-ons section and click on Unknown Sources.

As soon as you do that, a pop-up message will appear to warn you that any addons you install will have the same rights that Kodi has.
This means they'll have read\write access to any files on your device.
If the only thing you use your device for is streaming, then this might not be a big deal. However, if you run Kodi on your PC, where all of your personal files are stored, you may want to use caution.
Never install addons or builds on a device that you also store sensitive, personal information!
Click Yes to continue.

Once you click Yes, the toggle switch turns white and the setting is enabled.

Step 2: Add the File Source for the TV Addons Repository
Whenever you're installing a new repository, we first need to tell Kodi where that repository is located. That means adding a custom file source in the File Manager screen.
First, go to theSettings/System menu and click on theFile Manager icon.

Usually, this is where we add the folder locations for our media library, but you can also use it to point Kodi to an external source on the Internet.
In this case, we're going to point it to the TVAddons website.
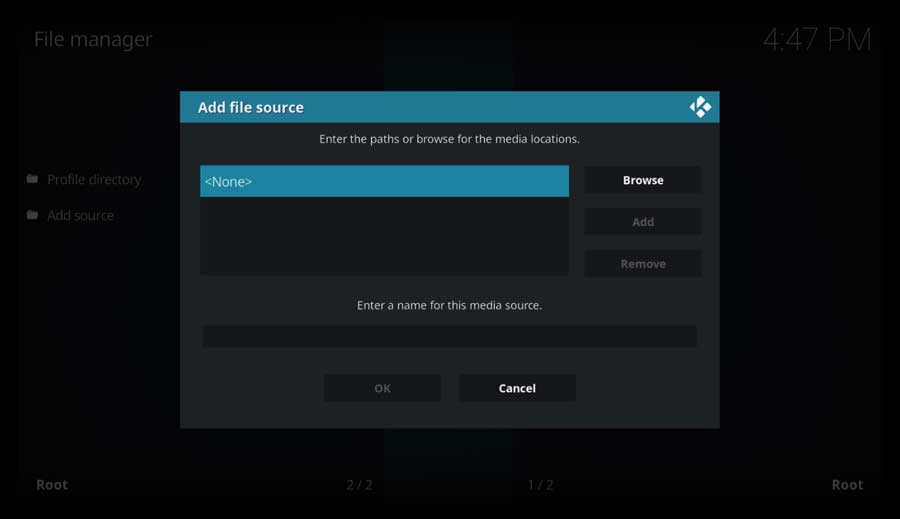
Click on Add Source.

In the Add File Source menu box, click on<None> to add a custom source.

Many third-party developers will host their repositories on a public website like GitHub. However, some will have their own website and host the repository there. It gives them a little extra control on all of the source-code, but they give up some flexibility when working with other developers.
TV Addons is one of those developers that hosts their repositories on their own website.
Type in the following URL and click OK:
http://fusion.tvaddons.co

Scroll down to the next section where you can Enter a Name for this File Source.

Next, we'll create a name for this media source.
You can name it anything you like, but I like to name mine for the source itself. It helps me not to get confused if I have multiple sources on the same Kodi installation.
Here, I named mine TVAddons.
Once you've entered a name, click OK to continue.

Once you have the file source URL and the name, click OK to continue.

Kodi will do a quick check to make sure that it can reach the site.
If it's successful, it'll bring you back to the File Manager window. Your new file source will be listed on the left-hand side of the screen.

Step 3: Install the TVAddons Repository from Zip File
Here's where things branch off from your typical Kodi addon installation.
Go back to your Kodi home screen, and scroll down until you find the Add-ons section. Then, click the Install from Zip File icon.

This window displays all of the file locations on your device. This includes any internal folders, external drives like flash drives or external hard drives, as well as any shared network drives that you have.
It'll also show any custom file locations, like the one we just created.
Click on the name that you entered in the previous section.

Here you'll see a list of three additional folders:
- begin-here
- kodi-repos
- kodi-scripts
The Begin-Here folder includes the TVAddons Indigo installer. It's a handy tool that will walk you through the installation process automatically. However, it has been known to have conflicts with other addons like The Crew.
Since The Crew is one of my favorite Kodi addons, we're going to skip the Indigo installer and install the TVAddons repository manually.
Click on the Kodi-Repos folder.

Since my native language is English, I'm going to click on that folder. Other languages are available in the Foreign folder.

As you can see, there are A LOT of repositories listed here!
The one we're looking for is the repository.xbmchub zip file. Scroll down until you find that (near the bottom), and click on it to continue.

After a few moments, you'll be taken back to the Add-ons screen and a message box will appear saying the TVAddons.co Add-on Repository is installed.

Step 4: Install the TVAddons Resolver Repository
There's one additional step that we need to do before we can start installing the addons in this repository. That's to install the TVAddons Resolvers Repository as well.
Start by clicking on the Install from Repository icon.

Scroll down to the TVAddons.co Add-on Repository and click on it.

Select Add-on Repository.

Then click on TVADDONS.CO Resolvers Repository.

That takes you to the repository's detail page.
Click Install to continue.

After a moment, you'll see a pop-up message telling you the TVADDONS.CO Resolvers Repository add-on has been installed.

Now that both TVAddons repositories have been installed, you can start browsing all of the included addons. As with other repositories, they're all sorted into several categories like Video Add-ons, Context Menus, Look and Feel, etc..
Once you find an addon that you like, you can click on it to start the installation process.

How to Update TV Addons Repo in Kodi
Unfortunately, addons and repositories that we've installed from a zip file will need to be updates manually. Thankfully, the process is pretty simple to do.
To start, go back to the Add-ons tab, and click Install from Repository.

Scroll down and select the TVADDONS.CO Add-on Repository.

Select Add-on Respository.

Then select the TVADDONS.CO Add-on Repository again.

That takes you to the respository's detail page.
Click the Update button to start the update process.

how to add tvaddons to kodi
Source: https://androidtvnews.com/tv-addons-repo/
Posted by: tayloraboold.blogspot.com

0 Response to "how to add tvaddons to kodi"
Post a Comment